Mastering the Art of Racking Pool Balls: A Step-by-Step Guide
Racking the pool balls is an essential skill for any billiards player. The way the balls are arranged on the table can significantly impact the outcome of a game. Whether you’re a beginner or a seasoned player looking to refine your skills, understanding the proper technique for racking pool balls is crucial. In this blog post, we will take you through a step-by-step guide to help you master the art of racking and achieve optimal ball placement for a fair and exciting game of pool.
Step 1: Gather Your Equipment
Before you begin, ensure you have the necessary equipment: a pool table, a set of billiard balls, and a pool rack. The rack is a triangular frame that holds the balls in the desired formation. Choose a rack that is appropriate for the game you’re playing (e.g., 8-ball, 9-ball) and ensure it fits snugly on the table.
Step 2: Position the Rack
Place the rack on the pool table, with the apex or pointed end of the triangle facing the foot of the table. The rack should be centered at the head spot, which is the center point on the table’s foot rail.
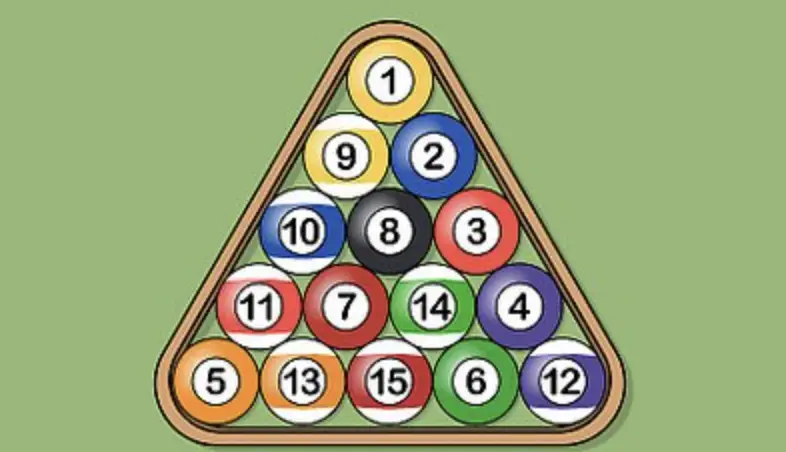
Step 3: Arrange the Balls
Begin arranging the balls within the rack. For 8-ball, the most common game, the solid (or low) balls numbered 1 to 7 should be placed in the bottom corner of the rack. The striped (or high) balls numbered 9 to 15 go in the other bottom corner, with the 8-ball placed in the center. For 9-ball, the balls are arranged numerically in ascending order within the rack.
Step 4: Tighten the Rack
Once the balls are in place, press the rack firmly down onto the table to ensure a tight fit. This minimizes gaps between the balls and helps maintain their position during the break.
Step 5: Remove the Rack
Carefully lift the rack off the table, ensuring the balls remain in their designated positions. The racked balls should form a neat triangle, with the apex ball at the front of the formation.
Step 6: Inspect and Adjust
Take a moment to inspect the rack and ensure the balls are tightly packed together without any gaps or misalignment. If necessary, gently adjust the position of the balls by hand to correct any imperfections.
Step 7: Ready for the Break
Once you’re satisfied with the rack’s alignment, the balls are ready for the break shot. Place the cue ball behind the head string, and prepare for an exciting start to your pool game.
Pro Tips:
- When racking, apply equal pressure on the balls to ensure they are packed tightly. This helps prevent gaps and ensures a consistent break.
- If you notice a gap or loose ball after removing the rack, gently tap the corresponding ball into place with a cue stick to tighten the formation.
- Practice racking regularly to improve your accuracy and consistency. The more you practice, the more comfortable and efficient you will become.
Conclusion:
Properly racking pool balls is an essential skill for any billiards player. By following these step-by-step instructions and practicing regularly, you can ensure a fair and consistent ball formation for every game. Remember to choose the appropriate rack for the game you’re playing, arrange the balls correctly, and tighten the rack for optimal results. With a well-racked set of balls, you’re ready to break and enjoy an exciting game of pool. Sharpen your racking skills, refine your technique, and get ready to make precision shots with confidence.